Book Here

Monday, May 11, 2020

FREE Home Base Jobs Ideal for Housewife | Work anytime while staying at home

Due to the Pandemic "COVID 19"  that we are facing right now, most of the affected are factory workers and some are office workers. They cannot go to work to maintain social distancing. They are struggling with how to meet monthly ends. Some are lucky enough if they have savings on their bank accounts. Others rely on our government's help. Our government provides aids to our affected fellow countrymen by giving them financial help. Fortunately, most of them were able to receive help.

I, on the other hand, as a FREELANCER would like to help our fellowmen by sharing online opportunities. They will earn by doing simple tasks while staying at home. Most of the online jobs that I am going to share are FREE. They don't need to pay any registration fees. They only need to have a working laptop/desktop and an internet connection. Below is the list of online opportunities I believe can help them. 


1. Hivejobs -  Make extra money through small jobs you can do anywhere, anytime, and from any device

Each qualifier exam unlocks new tasks for you to do.

Examples are:
  • Draw a box around an object
  • Categorize the scene in an image
  • Transcribe audio to text
  • Track the same object across frames in a video
These are the category of the jobs they offer;


Sample of the Jobs;


Their payout methods; minimum of $5 to withdraw
  • Paypal
  • Bitcoin

2. Microworkers - it started the year 2009 - 2020. An innovative crowdsourcing platform that connects Employers as well as Workers globally. They offer effective solutions to companies and businesses in need to outsource their jobs and projects.

These are the category of the jobs they offer;


Sample of all jobs;


Their payout methods; You need to earn at least $9 + fees 
  • Skrill/ Dwolla - 6.50% 
  • PayPal - 7.50%
  • Local Funds Transfer via Transpay - 3.00% + $1.00 for Non-USD transfer/$3.00 for USD transfer) to be able to place a withdrawal request. 
  • For Payoneer, you need to earn at least a $20 + 5.00% fee.
3. Picworkers - the same with the micro workers, the only difference is their platform used. Clients can hire freelancers to do work in areas such as promoting on social networks, writing, testing websites, data entry, downloading, searching, installing, and testing mobile apps right through to language learning, sales and marketing, accounting, and legal services.


Their payout methods; minimum withdrawal $5.

Users can withdraw money when they earn $5.00. Withdrawals are processed a few times per week. We charge a small fee to process withdrawals. Different withdrawals options come with different fees.
  • Coinbase (Litecoin / Ethereum)
  • Paypal

    Friday, April 17, 2020

    Part 4 - Create a Blog Post Wordpress Blog Steps

    Create Wordpress Blog Post

    Step 1. Login to your wordpress blog. 
    Step 2. Click my site and then Site then POST. 
    Step 3. Click add new Post it is located on the right side of the dashboard...


    Step 4. Add your 1st post Title sample " My 1st Blog Post"
    • Type your context under the title. 
    • Hover the "+" icon so the popup features will show. 
    • You can edit the size/font and add images using the popup features.
    • You can add a youtube video. 
    • You can add a link to your text by using the hyperlink icon.


    Step 5. Click " Publish" so the other features will show. You can now set up your first post features.


    Step. 6. Make sure the visibility of your post is on public.
    Step 7. Add tags, this is important for SEO purposes.
    Step 8. Connect your socmed/ social media account so you can automatically share your post.
    Step 9. You can now click " Publish"


    Your post will be seen on your "HOME" page and in your "BLOG" page.

    Video Tutorial


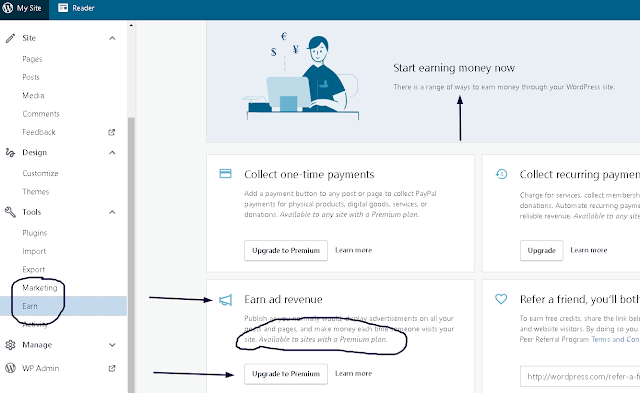
    In order for you to earn from blogging, you must keep on posting every day in 3 months. The more post you create the higher chances you have to get approved on " Google AdSense"

    We will tackle this again after 3 months (today is April 18,2020 - July 18). You must prepare money because we need you to upgrade your free blog. If you do not want to pay I recommend you use a blogger account.

    The saddest part when using a blogger account is when you violate one of google Adsense policy you will be automatically get banned from accessing your google Adsense account. Meaning, you will lose all your current balance in your Adsense account.

    So we must be careful and we must follow Adsense policy. Just like on youtube it does have the same policy.


    Next Blog (Creating a blogger account on - WIX)

    Thursday, April 16, 2020

    Part 3 - Menu Display Location (Wordpress Blog Steps)


    Menu Display Location
    Part 3 Wordpress Blog Steps

    Step 1. Go over to " my site " and click "view all locations''.

    You will see the locations in which you can add menus.


    1. Header/Primary - This is where the menu located (Home / About / Blog / Contact) the title of your blog and logo.

         
          2. Footer - It is located below on your website.


          3. Social - You can add social icons anywhere you want ( header / footer / widget / sidebar)


    Automatically Add Pages to your Menu

    Step 1. Click " Primary" din click " add items"


    Step 2. Type " Sample Only" and click add.


    Reorder Menu Items

    Step 1. Hover on the menus you can " drag and drop them ".


    Delete Menu Items

    Step 1. Go over the menus and click the X icon in red color. 


    Customize the Menu Item Text

    Step 1. Go over the menu and click " add items" and scroll up then you will see the word " and do not forget to click the word " CLICK CHANGES" located on the top part of the menu.


    Video Tutorial


    Next : Part 4 - Create a Blog Post Wordpress Blog Steps)

    Please follow me on my youtube and fb page.

    Wednesday, April 15, 2020

    Part 2 - Create a Menu & Add Menu Items (Wordpress Blog Steps)

    Create a Menu

    1. Click My Site(s), then Design 🠒 Customize.
    2. In the Customizer, click the Menus tab.
    3. If your theme already has a default/primary menu, you can click on it to begin editing.
    4. Click on Primary to add items to your menu.
    Custom Menus - Menu Locations

    Site Menus - Customizer


    1. If your theme does not already have a default or primary menu click Create New Menu
    2. Give your menu a name
    3. Select where you want the menu to appear (your options will depend on your theme)
    4. Click Next to begin adding items to your new menu
    Custom Menus - Create New Menu


    Name the menu and select the menu location


    Site Menu - Setting up a New Menu


    Add Menu Items

    In addition to pages you have already published, you can add several different types of menu items to your custom menu:
    • Custom Link – a custom URL linking to another site.
    • Pages – a link to another page on your site.
    • Posts – a blog post on your site.
    • Testimonials – a link to testimonials.
    • Projects – a link to a page of your portfolio projects.
    • Categories – a feed of blog posts from a given category.
    • Tags – a feed of blog posts from a given tag.
    • Project Types – a link to a specific portfolio project type.
    • Project Tags – a link to a specific portfolio project tag.
    To add one of these menu items:
    1. Click the + Add Items button.
    2. Choose a menu item type from the list. For example: Pages.
    3. Select one of the options displayed for that type. For example, click + Home to add a link to your home page to the menu.
    4. Add more items to your Custom Menu by clicking the plus next to each item.
    5. Click Save Changes to save your changes.
    If you wish to add a brand new page or post to your menu, you can add its title in the field for Add New Page or Add New Post. A blank page/post will be added to your site and automatically added to your menu.
    You can then add content to the page or post through your Site Pages/Posts
    Video Tutorial


    Tuesday, April 14, 2020

    Part 1 Steps on How to Create Wordpress Blog

    Wordpress Blog Steps

    You must have internet connection, laptop/desktop or cellphone in order for you to create your 1st blog. 


    Step 1.Go over to google search and type: wordpress blog and click  "Wordpress.com: Create a Free Website or Blog."


    Step 2. Fill up the form;


    Step 2. Choose your domain name sample " Cebu Latest News" and select "cebulatestnews.wordpress.com" and click " SELECT"


    Step 3. Click "Select start with a free site" and you will be directed to your "dashboard."


    Step 4. Give your Site a "Name" sample is ''Cebu Latest News"


    Step 5. Right click to view your site.


    This is what your site look like.  

    Step 6. Click " My Site" to go back on your dashboard.


    Step 7. Change your ideal theme. Go over to the left sidebar and look for the word "THEME" click it and you can now Select your Free Theme.


    Step 8. Click the 3 dots and select " Live Demo" to preview your theme"


    Step 9. To preview which platform that you would like to see. Just click the dropdown box with the word " Desktop" and a list will show. 
    1. Desktop
    2. Tablet
    3. Cellphone
    Step 10. Go over to the right side and click " Activate " 


    Step 11.  Click "Yes Activate Shawburn". 


    Step 12. Click " view site" you will be redirected to new tab.


    This is what your blog look like when you applied the theme;


    Video Tutorial


    Next Tutorial
    (" Create a Menu & Add Menu Items"
    Site Menus are a list of links that are usually displayed as the main navigation for your site. The menu location can vary depending on your theme, and some themes offer additional menus such as social links menus.
    Table of Contents
    1. Create a Menu
    2. Add Menu Items
    3. Menu Display Location
    4. Automatically Add Pages to your Menu
    5. Reorder Menu Items
    6. Create Drop-Down Menus
    7. Delete Menu Items
    8. Customize the Menu Item Text
    9. Save your Changes
    For more info please message me directly to my facebook page.
    Thank you and God bless

    Monday, April 13, 2020

    Start Blogging | Be Your Own Boss | Earn Money


    BE YOUR OWN BOSS | EARN MONEY


    Hindi muna kailangan gumastos para sa travel expenses mo araw2.

    Hindi muna kailangan magpa pogi / magpa ganda para ka kumita dito.

    Hindi muna kailangan pa na mag trabaho 8hrs per day.

    Hindi muna kailangan tumayo ng 8hrs per day kung ikaw ay isang promodiser/merchandiser.

    Sa blog ikaw ang boss dito! Kung ano ang pinaka gusto mo na gawin araw2 ito na tamang panahon kung para ito ay pagka kitaan.

    Mga niche sa pag blog!
    1. Product Reviewer - nagbibigay ka ng product review sa isang product.

    2. Travel Blogs - mag promote ka ng mga tourist spots etc.

    3. Food Blogs - pwede mo ito magawa sa bahay or mag travel.

    4. Fashion blogs - Fashion blogs are one of the most popular types of blogs on the internet.

    5. Music blogs

    6. DIY Blogs

    7. Song Blogs

    8. Movies Blog

    9. Sports Blog

    10. Lifestyle

    11. Daily Events / Political News

    12. Fitness

    13. Finance

    14. Parenting

    15. Business

    16. Personal

    17. Car

    18. Pet

    19. Gaming

    20. Etc.

    Follow my Fb page para masubaybayan ninyo kung ano ang mga steps na dapat ninyo gawin while naka quarantine tayo. 

    Ito iyong facebook page ko: Online Assistance 

    Paano gumawa ng sariling blogger site?
    1. Kailangan meron kang internet connection.

    2. Dapat meron ka kahit isa nito - Cellphone / Laptop / Desktop

    3. Dapat mahaba ang Patience mo dito kase hindi ito instanct na magkaka pera ka agad.

    Free sites sa pag blog.
    WordPress (Self-Hosted)

    -is an open-source platform to build a blog on and it’s 100% free to use, because the creators of WordPress believe in democratizing publishing and the freedoms that come with open source.


    2. Wix


    - Wix is a website builder with a drag and drop interface. It’s a (WYSIWYG) software so you know exactly what your blog will look like before you hit the “publish” button.


    3. WordPress.com

    - you can start a blog or build a website in seconds without any technical knowledge.”


    4. Weebly

    - Same with wix; drag and drop feature ( ideal for business blogs)


    5. Blogger

    - Google owns this site, it is free to use and easy to maneuver. I am currently using it now.


    Our next blog:

    (Video tutorial - Steps on how to create your wordpress blog)
    Recommended Reading

    Do not hesitate to contact me via may facebook page if you have any questions.
    You can reach me hear as well Email: jvdealsclub@gmail.com