Book Here

Tuesday, August 28, 2018

Eobot Tutorial

How to get started in Eobot?

First create or register an account with eobot by clicking on logo to get started or from sign up button below.

So no worries as you don't need to invest upon sign up like other cloud mining sites that requires you to purchase for hashrate/power to start your mining.

Here we can use the available faucet from their site and claim everyday and we can later on exchange from some hash to start mining.

Just an overview when you log in to your homepage account.
homepage
You may click on Products tab and scroll to faucet to get your free cryptocurrency which you can exchange to start mining.
products
And typical to solve the captcha to claim reward.
solve_captcah
Simply go back to your account and click on exchange.
Exchange
Now you may exchange to other cryptocurrency or simply buy cloud SHA to start mining.
Select_preferred_Cloud_SHA_rental
Then you will be directed to its history page to give you transactions made.
History
Go back to your account and start selecting the cryptocurrency and start mining.

Now log in again the next day to get your free cryptocurrency that you may use to exchange to add up to your power.

Note you are not obliged to invest but if you feel the need to speed up your mining then its your own choice. Share your referral links to earn commissions.

Tuesday, July 24, 2018

Steps on How to Register in Crypto Mining Game

Steps to Register in Crypto Mining Game 2018

Let's Earn Some Goody Ecurrency For Free!!!
1. Register Link: Cryptomining Game
2. Confirm email and login
3. Go to (Mission) and choose 1 ecurrency the choices are (Satoshi/Dogecoin/Litecoin) click (do it). When the runs out click (Claim)
4. Go to (Mine) then select (Mine Game) Scroll down then

5. Choose 1 ecurrency to mine the choices are (Satoshi/Dogecoin/Litecoin)

6. Go over your avatar on the left side and look for the word (Refill Energy) and then click it. After Clicking there is a pop up and click any of the following url shortener then answer captcha.

7. Just Repeat the Process to reach Level 10.

8. For withdrawal sign-up on FaucetHub.
9. To transfer your Ecurrency money to CoinsPh register here.

Steps To Creat FaucetHub Account and withdraw Direct to COINS.ph / Binance / Coinbase etc.


Steps To Creat FaucetHub Account and withdraw Direct to COINS.ph / Binance / Coinbase etc. 


1. Click this ---> Faucethub And fill the signup form with required information correctly. 

2. Input your correct bitcoin wallet address which you can use to login. You can choose below.


BITCOIN WALLET ADDRESS

1. BINANCE
2. COINBASE
3. COINS.PH

3.After signing up go to login panel and login your account.(confirm your account by email if required).

4. Fill login form with user id and password and solve the correct captcha to login into your dashboard.

FaucetHub Account link to Bitcoin Wallet:


1. Go to your faucethub dashboard and click on the wallet addresses.

2. Now First copy your bitcoin wallet address or any wallet address you want to link to your faucet hub micro wallet. You can use any of the following below.

BITCOIN WALLET ADDRESS


3.Now paste your wallet address in the box as shown below and select the currency you want to link and lastly click on link address.

4. Generate Wallet addresses in Faucethub to start to Claim Cryptocoins.


5. Click here: Faucetlist you can choose any of the ff. faucets. There are two types of faucet claims. Manual and Auto Faucet.

Manual Faucet gives higher altcoins than Autofaucet...


Auto Faucet ListFaucethub WalletWithdrawal
Bitcoin
Auto BitcoinFaucethubCoins.ph
Ethereum
Autofaucet - 1FaucethubCoins.ph
Litecoin
Autofaucet - 1FaucethubCoins.ph
Dogecoin
Autofaucet - 1FaucethubCoins.ph
Autofaucet - 2FaucethubCoins.ph
Autofaucet - 3FaucethubCoins.ph


6. Now you have a micro wallet that you can use to earn free satoshis.


Secure you Micro Wallet:

1. You can secure your micro wallet by choosing a strong password with a combination of uppercase and lower case characters, special symbols and numbers.

2.to make your account more secure you must activate 2-factor Authentication by installing 2FA app on your mobile and link with it.

3. Don't ever give your login details to anyone else for security reasons.

4. Always link multiple wallet addresses for more security.


Video on how to generate your faucethub wallet address: https://youtu.be/ZO56xTlsFbo

Steps on how to work in crypto: https://youtu.be/m4-Jxkgnhrg

Creating a Binance accounts is free, and super easy to set up.

Creating a Binance accounts is free, and super easy to set up. To start:

Step 1.  Click here to go to Binance and set up your account by clicking Register at the top right corner of the page.

2. Enter your personal details.
4. A confirmation email will be sent to your email. Check and verify your account.
5. Add additional security to your Account by activating the 2FA (Two-Factor Authentication). Download Google Authenticator from Google Play(Android) or App Store(IOS).
6. Add funds from to your Binance account. Remember, you can’t purchase coins with fiat currency, you need to first purchase them from Coinbase and deposit them to Binance. Select Funds at the top right and click on Deposits Withdrawals.
7. Select to deposit the coin you purchase from Coinbase, Bitcoin(BTC), Bitcoin Cash (BCC)Ethereum(ETH) or Litecoin(LTC).
7.1: For this example, we will deposit Ethereum(ETH). Search for the currency at the Search at the top left
8. After Clicking on Deposit, you’ll see a ETH Deposit Address which you can send your Ethereum purchased from Coinbase. For every coin, the Deposit Address is different, so if you’re transferring Bitcoin, search for BTC > BTC Deposit Address.
9. Once you have Ethereum(ETH) or Bitcoin(BTC) in your funds, you can start purchasing other cryptocurrencies and altcoins.
10. Select the coin you would like to trade by selecting on it.
10.1: In Binance, the coins used to trade for most of the altcoins and cryptocurrency are: Bitcoin(BTC), Ethereum(ETH), Binance Coin(BNB).
10.2: Selecting ETH as the market, you can view which currencies are traded with ETH.
10.3: For the example, we’ve chosen Verge/Ethereum (XVG/ETH). Now you can start buying/selling the currency.
11. As we’ve chosen Verge(XVG)/Ethereum(ETH) we’ll use it as a demonstration in Buying and Selling Verge(XVG) with Ethereum(ETH).
There are 3 choices:

1. Limit (Recommended)
2. Market (Never use this)
3. Stop-Limit (Only if you’re intending to trade frequently)
11.1: Select the price you would like to purchase Verge(XVG) based on Ethereum(ETH).
11.2: Select the amount of Verge(XVG) you would like to purchase. If you select the values 25%, 50%, 75% and 100%. It will automatically populate the amount based on the total amount of Ethereum(ETH) that you have.
11.3: The total amount of Ethereum(ETH) will be displayed.12. Once you’ve purchased your coins, you can choose to transact them for Ethereum(ETH) or Bitcoin(BTC) should you ever want to withdraw the amount.
13. To make a withdrawal, go back to Funds>Deposits Withdrawals(Step 7). Select Withdrawal on the currency and enter the Withdrawal Address to where you want to send it to.


Steps To Creat FaucetHub Account:

1. Go to Faucethub And fill the signup form with required information correctly. 

2. Input your correct bitcoin wallet address which you can use to login. 

1. Coins.Ph - Available in Philippines Only.
2. CoinBase 

3.After signing up goto login panel and login your account.(confirm your account by email if required).

4. Fill login form with userid and password and solve the correct captcha to login into your dashboard.

FaucetHub Account link to Bitcoin Wallet:

1. Goto your faucethub dashboard and click on the wallet address.

2. Now First copy your bitcoin wallet address or any wallet address you want to link to your faucet hub micro wallet.

3.Now paste your address in the box as shown below and select the currency you want to link and at last click on link address.

4. That's All.Now you have an micro wallet for earning free satoshis .

Secure you Micro Wallet:

1.You can secure your micro wallet by choosing an strong password with combination of uppercase and lower case characters ,special symbols and numbers.

2.to make your account more secure you must activate 2 factor Authentication by installing 2FA app on your mobile and link with it.

3.Don't ever give your login details to anyone else for security reasons.

4.Always link multiple wallet addresses for more security.

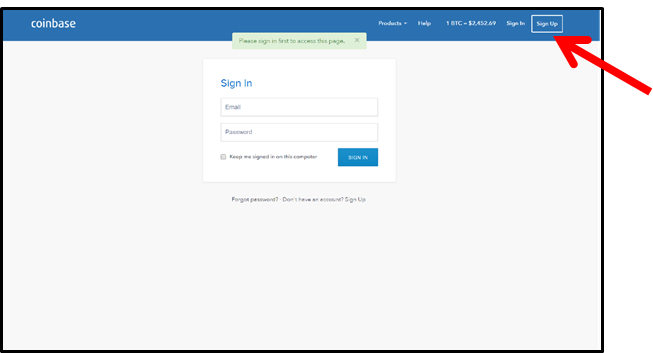
Creating a CoinBase accounts is free, and super easy to set up. To start:

Creating a CoinBase accounts is free, and super easy to set up. To start:

Step 1. Go to CoinBase  and click “Signup” at the top right-hand corner of the page.


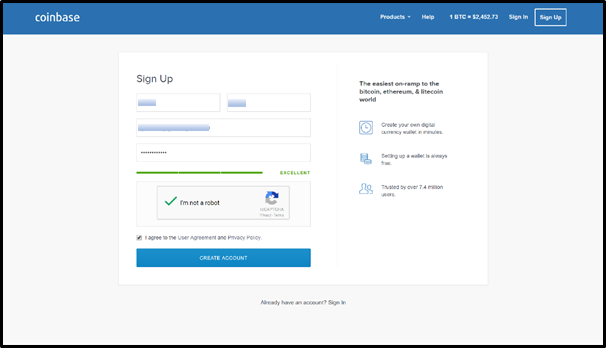
Please carefully review the terms of the User Agreement and Privacy Policy.
Once you’ve reviewed all the terms:
  1. Fill in your personal details
  2. Check the “I agree to the User Agreement and Privacy Policy”,
  3. Click “Create Account”


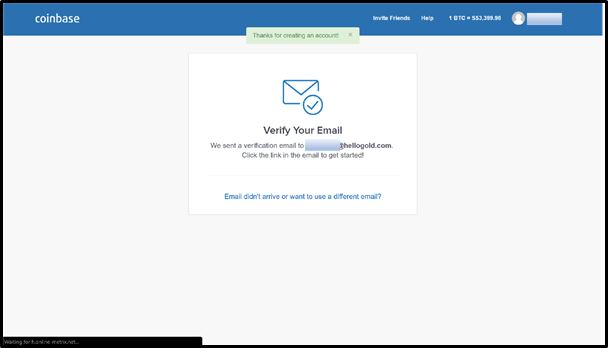
You will be directed to a confirmation page upon submission.


Step 2:
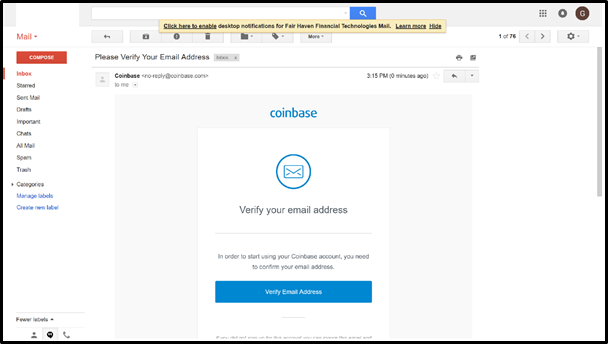
A verification link is sent via email.
Navigate to the email address specified in the initial step and click “Verify Email Address”.
Note: Check your junk folder if you do not receive any emails from Coinbase.


Step 3:
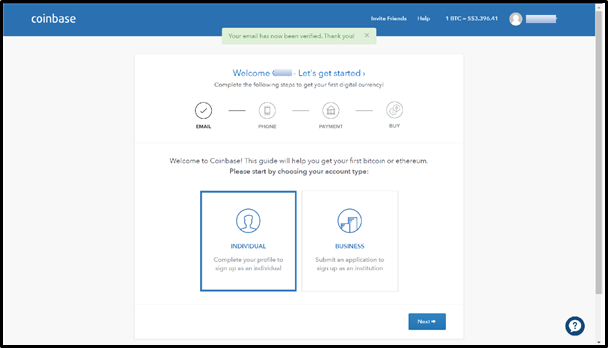
Set up your account.
Begin by selecting your account type. For the purpose of participating in HelloGold Foundation’s Token Sale, select “Individual”.


Step 4:
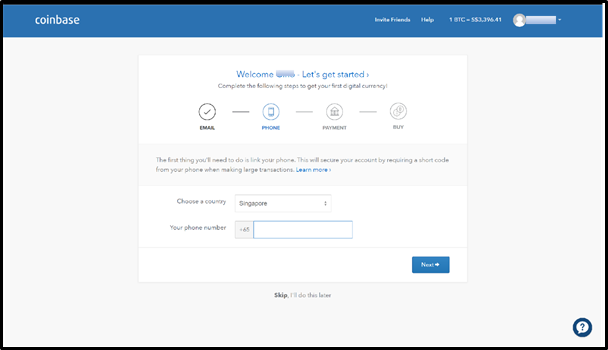
Enter local phone number.
This is required for:
  • Logins (2-Step Verification)
  • Transactions


Step 5:
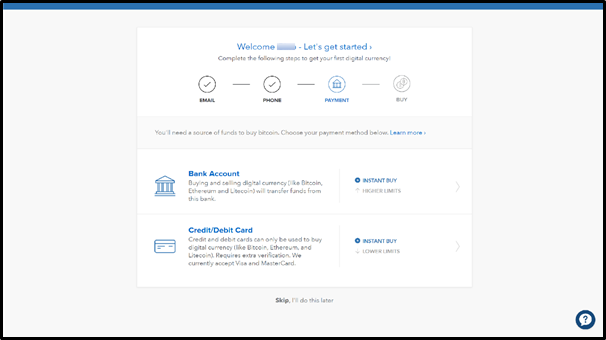
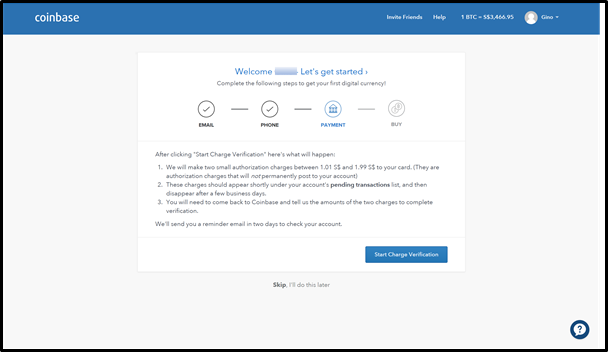
Select payment method.
Connect your bank account, debit card, or credit card to purchase and sell digital currency with local currency.


Personal identification is required before any payment method can be selected.
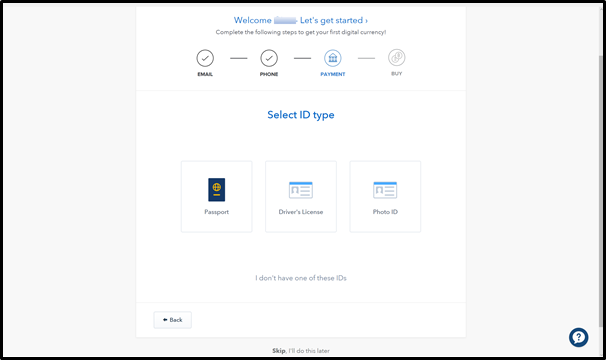
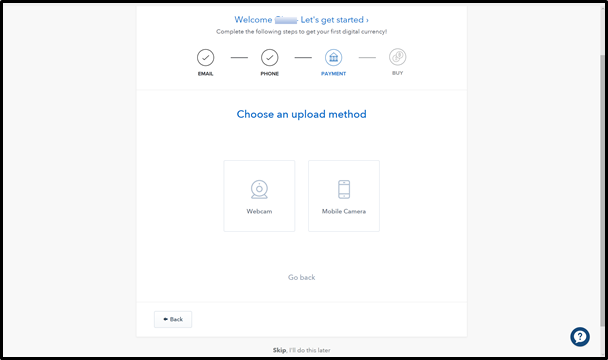
Coinbase will redirect you to this page, where three modes of identity verification are allowed:
  • Passport
  • Driver’s License
  • Photo ID


Select the preferred method of uploading identification documents.


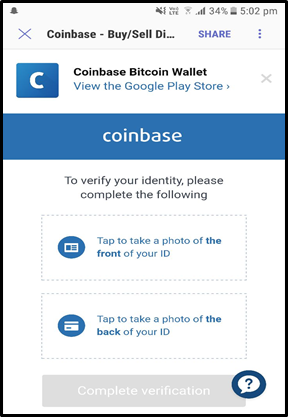
Should you choose the mobile camera upload method, a link leading to the following screenshot would be sent to the phone number specified earlier via message.


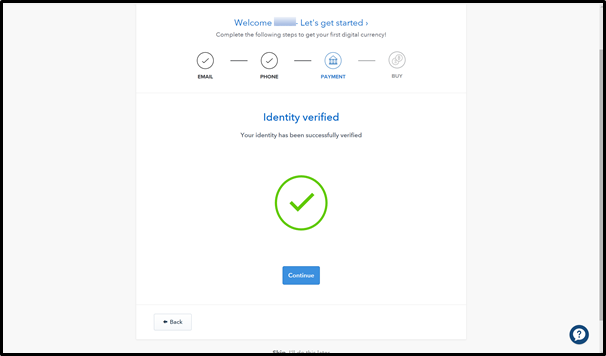
Once your documents are uploaded, you will be directed to the following upload page.


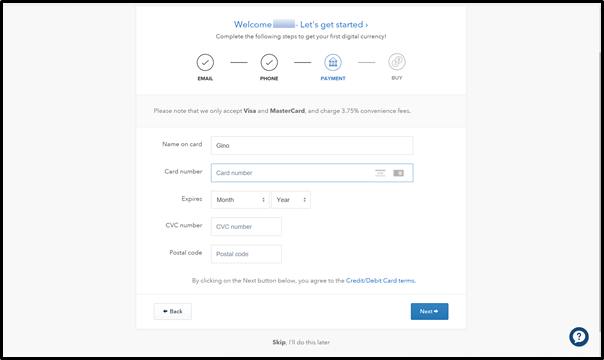
You may now enter the details of your preferred payment method.


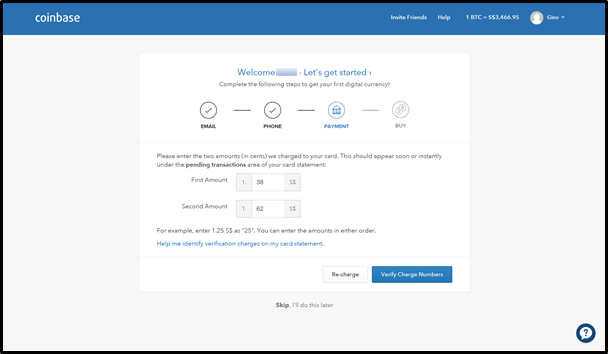
Two charges will be made to the bank account under “Pending Transactions”.
You are required to determine the last two digits of these charges.


These charges can be found from online bank statements (iBanking).


Enter the last 2 digits of each charge, and click “Verify Charge Numbers”.


And you’re done!